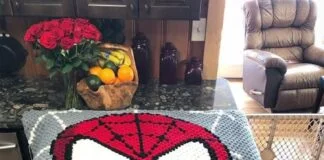
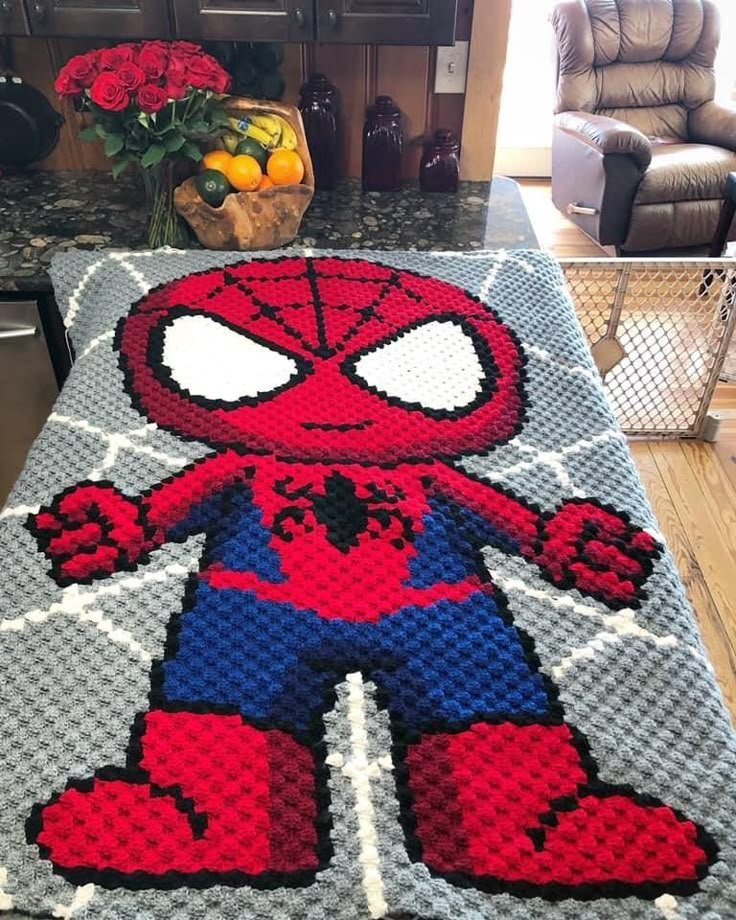
The Spiderman Crochet Blanket is a fun and vibrant way to incorporate your love for the iconic superhero into your home decor. This pattern will guide you through the process of creating a cozy and colorful blanket that showcases Spiderman’s web design and vibrant colors. Whether you’re a seasoned crocheter or a beginner looking for a challenging yet rewarding project, this pattern will help you create a beautiful blanket that’s perfect for any Marvel fan.
This Spiderman Crochet Blanket combines two important elements: the classic red and blue colors of Spiderman’s costume and the intricate web pattern that fans know and love. By using simple crochet stitches and a bit of creativity, you can design a unique blanket that not only provides warmth but also adds an eye-catching, superhero-inspired touch to your living room or bedroom.
Let’s dive into the materials you’ll need and the step-by-step instructions to bring this Spiderman-themed crochet blanket to life.
1. Materials Needed for the Spiderman Crochet Blanket
Before you begin your crochet project, make sure you have all the necessary materials. Here’s what you’ll need to create your own Spiderman Crochet Blanket:
Yarn
- Red Yarn: The main color for the blanket’s base (Spiderman’s suit). You’ll need several skeins of red yarn, as it will cover a large portion of the blanket.
- Blue Yarn: For the bottom part of Spiderman’s suit. This will contrast beautifully with the red and help define the Spiderman design.
- Black Yarn: For the spider web detailing and the Spider-Man emblem. This will be used for the web pattern and the spider silhouette in the middle of the blanket.
- White Yarn: To create Spiderman’s eyes in the center of the design.
Crochet Hook
Use an H/8 (5mm) crochet hook or the hook size that works best with the yarn you choose. The goal is to have a tight, even stitch so that your blanket will hold its shape and be durable.
Yarn Needle
A yarn needle will be necessary for weaving in the ends after you finish each color change and to add the final touches to the design.
Advertising
Scissors
Scissors are essential for cutting yarn when you change colors or finish a section of your crochet.
Stitch Markers
Stitch markers can help you keep track of your rounds and the changes in your pattern, especially for the web design.
Measuring Tape
A measuring tape will help you ensure that your blanket reaches the desired size.
Now that you have your materials ready, let’s begin the process of crocheting your Spiderman-inspired blanket.
2. Basic Crochet Stitches for the Spiderman Crochet Blanket
This Spiderman Crochet Blanket uses basic crochet stitches, but it’s important to familiarize yourself with them before you start. Here are the key stitches used in the pattern:
Chain Stitch (ch)
The chain stitch is the foundation of most crochet projects. It’s the first stitch you’ll use to start your foundation row.
Slip Stitch (sl st)
The slip stitch is used to join stitches together or to finish off a round.
Single Crochet (sc)
The single crochet stitch is used throughout the blanket to create tight, solid stitches.
Half Double Crochet (hdc)
The half double crochet stitch is used to create a slightly taller stitch that will help build the structure of the blanket.
Double Crochet (dc)
The double crochet stitch is used to create longer, airy stitches that form the overall structure and texture of the blanket.
Treble Crochet (tr)
The treble crochet stitch is a tall stitch that creates a lacy effect, which you will use to create the webbing design.
Front Post Double Crochet (fpdc)
The front post double crochet stitch is used to create a raised texture for the spider web.
Back Post Double Crochet (bpdc)
This stitch is similar to the front post double crochet but works on the back of the post, creating a raised texture for the blanket.
Once you’re familiar with these stitches, you’ll be ready to start creating the blanket.
3. Crochet Instructions for the Spiderman Crochet Blanket
Now that you know what materials you need and the basic crochet stitches, it’s time to start crocheting your Spiderman Crochet Blanket. Below are the instructions for creating the base of the blanket, the web pattern, and the Spider-Man emblem.
Step 1: Create the Foundation Chain
Start by creating a foundation chain that’s long enough to achieve the width of the blanket you want. For a standard throw blanket, aim for around 120 chain stitches, but you can adjust the number based on your desired size.
Step 2: Build the Blanket with Single Crochet
In the first row, work a single crochet stitch into each chain stitch across the row. Continue for a total of 60 rows of single crochet stitches in red yarn. This will create the red portion of Spiderman’s suit.
Step 3: Add the Blue Bottom Portion
Once you’ve completed the red portion, it’s time to switch to blue yarn to represent the lower half of Spiderman’s suit. In the next row, change to blue and continue crocheting in single crochet for 20 rows. The blue portion should cover about one-third of the blanket.
Step 4: Start the Spider Web Design
Now it’s time to add Spiderman’s iconic web to the design. You’ll be crocheting the web in black yarn. Start by creating a circular foundation in the center of the blanket, using treble crochet stitches to create the basic shape of the web. Use stitch markers to keep track of where the web will radiate from.
Continue adding layers to the web by crocheting front post double crochet (fpdc) stitches to create the raised lines of the web. Work in a spiral pattern, increasing the number of stitches in each round to widen the web.
Step 5: Add the Spider Emblem
In the center of the web, you’ll crochet a spider silhouette. Use black yarn to create a simple spider shape with single crochet and half double crochet stitches. Position the spider emblem right in the center of the web.
Step 6: Create the Spider-Man Eyes
Use white yarn to crochet two large oval shapes for Spiderman’s eyes. Place them in the center of the top portion of the blanket, just above the web. These eyes should be large enough to be a focal point of the design.
Step 7: Final Assembly and Borders
Once the main design of your Spiderman Crochet Blanket is complete, add a border around the entire blanket. Use a contrasting color like black or red to frame the blanket. You can use a simple single crochet stitch for the border or a more decorative stitch like shell stitch for added texture.
Finally, weave in any loose ends with your yarn needle, and give the blanket a final press to flatten the stitches and give it a neat finish.
4. Finalizing and Caring for Your Spiderman Crochet Blanket
Once your Spiderman Crochet Blanket is finished, you’ll want to take care of it to keep it looking great for years to come.
Washing and Care Instructions
- Wash your blanket by hand or on a gentle machine cycle, using cold water and a mild detergent.
- Avoid using fabric softeners, as they can affect the texture of the yarn.
- Lay the blanket flat to dry or dry it on a low heat setting to prevent shrinkage.
Displaying Your Blanket
Your new Spiderman Crochet Blanket will make an excellent addition to any room in your home. Whether draped over a couch, spread across a bed, or hung as a wall decoration, this blanket will surely be a conversation starter.
FAQ
1. How long will it take to complete the Spiderman Crochet Blanket?
The time to complete this blanket depends on your skill level and how much time you dedicate to crocheting. On average, it might take anywhere from 10 to 20 hours to complete the blanket.
2. Can I customize the colors for my Spiderman blanket?
Absolutely! You can change the colors to suit your preferences or to create a different superhero theme. For instance, you could use different shades of red or even experiment with other Marvel characters’ colors.
3. Do I need any special skills to make this blanket?
This blanket is suitable for intermediate crocheters, as it involves basic stitches along with some more advanced techniques like front and back post double crochet. However, with patience and practice, beginners can also tackle this project.
4. Can I make this blanket larger or smaller?
Yes, you can adjust the size by adding or subtracting stitches in the foundation chain. To make the blanket larger, simply increase the number of rows of each color section.
5. How do I change colors while crocheting?
To change colors, simply finish the stitch with the old color, drop it, and start the new stitch with the new color. Make sure to carry the unused color along the edge of the blanket to prevent gaps.
Conclusion
In this Spiderman Crochet Blanket tutorial, you’ve learned how to create a cozy, superhero-themed blanket that’s perfect for any Marvel fan. With vibrant colors and a detailed design, this blanket will add a touch of fun and style to any room.
We hope this tutorial has inspired you to crochet your own Spiderman blanket. If you have any questions or suggestions, feel free to leave a comment. Happy crocheting!