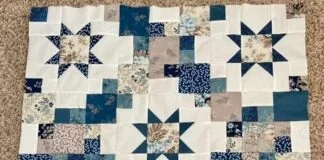
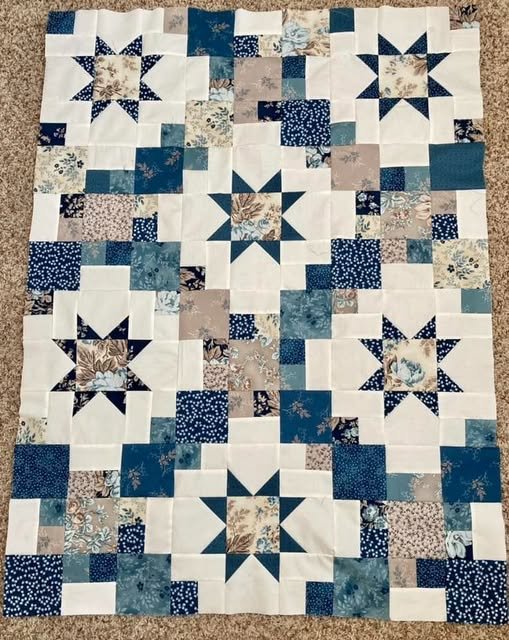
The Simply Elegant Quilt is a beautiful, straightforward design that captures the timeless beauty of quilting. This pattern is perfect for quilters of all levels, from beginners to experienced artisans, thanks to its simplicity and elegance.
With its clean lines and soothing colors, the Simply Elegant Quilt will bring warmth and style to any room, making it a wonderful addition to your collection or a meaningful gift for loved ones.
In this tutorial, we will guide you step by step through the process of creating the Simply Elegant Quilt, from cutting your fabric to assembling the quilt top. We will break down the pattern into easy-to-follow instructions that will help you achieve a quilt with clean, crisp lines, beautiful color contrasts, and an overall elegant finish.Let’s begin your journey into creating a stunning Simply Elegant Quilt.
1. Materials Needed for the Simply Elegant Quilt
Before you start, gather the materials needed for this quilt. The Simply Elegant Quilt requires a few basic supplies and fabrics, which can be easily customized to suit your style.
Fabric
- Quilt Top Fabrics: You’ll need to choose fabric in your desired color palette. This quilt pattern works well with both solid colors and prints. For a more traditional look, you can use a combination of light neutral fabrics and darker accent fabrics.
- Main Color (Light): Around 2-3 yards of a light, neutral fabric like cream, white, or pale gray.
- Accent Color (Dark): Around 2-3 yards of a contrasting, darker fabric like navy, charcoal, or deep red.
- Backing Fabric: For the quilt backing, you’ll need 4-5 yards of fabric, depending on the size of your quilt. Choose a fabric that complements the quilt top. A solid fabric or a subtle pattern works best.
- Quilt Batting: You’ll need a quilt batting that matches the size of your quilt top. The batting should be medium-weight to provide warmth and structure.
Tools and Supplies
- Rotary Cutter and Mat: For precise cutting of your fabric pieces, a rotary cutter and cutting mat are essential.
- Quilting Ruler: This tool will help you measure and cut fabric strips and squares accurately.
- Sewing Machine: A sewing machine will be necessary to stitch your quilt together. If you don’t have a machine, hand quilting is an option, but a machine will speed up the process.
- Quilting Thread: Choose a high-quality thread that matches your fabrics. You can use neutral thread or a color that contrasts nicely with your fabrics.
Other Essentials
- Scissors: For trimming excess fabric or cutting thread.
- Pins or Quilting Clips: To hold your fabric in place while you sew.
- Iron and Ironing Board: Pressing your seams as you go will ensure that your quilt top is smooth and flat.
- Quilt Binding Fabric: You will need fabric for the quilt binding. Typically, 2/3 yard is enough, but you can buy more if you’d like to make a thicker or more decorative binding.
Now that we have all our materials, let’s get started with the first step.
2. Cutting the Fabric for the Simply Elegant Quilt
The first step in making your Simply Elegant Quilt is cutting the fabric into the necessary pieces. This quilt is made up of simple squares and strips, which will be pieced together to form the quilt top.
Advertising
Step 1: Cutting the Main Color Fabric
- From your light-colored fabric (the neutral or main color), cut 4-inch wide strips. You will need to cut at least 10 strips that are 42 inches long (this is the width of the fabric).
- After cutting the strips, cut them into 4-inch squares. You should have around 40-50 squares depending on the size of your quilt.
Step 2: Cutting the Accent Color Fabric
- From your darker accent color fabric, cut 4-inch wide strips as well. You will need at least 10 strips that are 42 inches long.
- After cutting the strips, cut them into 4-inch squares. You should have about 40-50 squares of the darker fabric.
Step 3: Cutting the Quilt Backing and Batting
- For the backing fabric, cut 4-5 yards of fabric (enough to cover the entire quilt, leaving some room for seams).
- The quilt batting should be cut to the size of your quilt top, ensuring there’s extra for trimming later.
Once all your fabric pieces are cut, you’re ready to begin assembling your quilt top!
3. Assembling the Quilt Top
The Simply Elegant Quilt has a simple design, but it is the careful arrangement of colors and patterns that gives it its elegance. The pattern alternates between light and dark fabric squares, creating a checkerboard effect that adds visual interest.
Step 1: Creating the Blocks
- Start by pairing a light-colored fabric square with a dark-colored fabric square. You should have an equal number of light and dark fabric squares.
- Arrange the squares in a checkerboard pattern. For example, place a light square next to a dark square in a row, and alternate between light and dark squares across the row.
- Each row should consist of 10 squares (5 light and 5 dark), giving you a simple, balanced checkerboard effect.
Step 2: Stitching the Rows Together
- Using a ¼-inch seam allowance, sew the squares together in each row. Be sure to press each seam flat after you sew them to ensure your rows are even and neat.
- Once you’ve sewn all the rows together, you can start joining the rows to complete the quilt top.
Step 3: Joining the Rows
- Once all the rows are completed, sew them together to form the quilt top. Be sure to match the seams where the squares join to keep the checkerboard pattern aligned.
- As you join the rows, press the seams flat to avoid any puckering in the quilt top.
Step 4: Trimming the Quilt Top
- After you’ve finished piecing the quilt top together, trim any excess fabric from the edges to square it up.
4. Quilting and Finishing Your Simply Elegant Quilt
The final steps involve adding quilt batting and backing, quilting the layers together, and attaching the binding to finish your quilt.
Step 1: Layering the Quilt
- Lay your quilt backing fabric on a flat surface, and then place the quilt batting on top of the backing. Finally, place the quilt top on top of the batting, with the right side facing up.
- Use quilting pins or clips to secure the layers together, making sure the quilt is flat and smooth.
Step 2: Quilting the Layers Together
- You can quilt the layers together by sewing along the seams of the squares, or you can choose a simple all-over quilting design like straight lines, loops, or stippling.
- Use a quilting stitch or a walking foot to help feed the fabric through your machine smoothly.
- Once you’ve quilted all the layers together, trim any excess batting and backing from the edges.
Step 3: Adding the Binding
- To add the quilt binding, cut 2.5-inch wide strips of fabric. Join the strips together to form a long continuous piece.
- Fold the binding in half lengthwise and press it.
- Attach the binding to the quilt edges, starting from one corner and working your way around. Fold the binding over the edge of the quilt and hand stitch it to the back for a neat finish.
Once you’ve attached the binding, your Simply Elegant Quilt is complete!
FAQ
1. How long does it take to make the Simply Elegant Quilt?
The time it takes to make this quilt depends on your skill level and how much time you can dedicate each day. Typically, it can take anywhere from a few days to a few weeks to complete, depending on the size of the quilt and your stitching speed.
🌟Join our exclusive Quilt broadcast list on Messenger! Receive the best patterns, tips, and updates directly in your inbox. Our team is ready to send you delightful content that will inspire your projects. Don’t miss this opportunity to stay updated and create amazing pieces. Join now and be part of this passionate quilt community!✨📩
2. Can I use different fabrics for the quilt top?
Absolutely! While the pattern works best with light and dark fabrics, you can mix and match different prints, solids, or even add a pop of color to make the quilt your own. Just be sure that the fabrics you choose contrast well for the checkerboard pattern to be effective.
3. What if I don’t have a sewing machine? Can I make this quilt by hand?
Yes, you can hand stitch the quilt instead of using a machine. It will take longer, but the process is the same. Hand quilting can add a personal touch to your quilt, and many quilters enjoy the slow, meditative pace of handwork.
4. How do I care for my Simply Elegant Quilt once it’s finished?
To keep your quilt in good condition, machine wash it on a gentle cycle in cold water with a mild detergent. Dry it on a low heat setting or air dry to preserve the fabric.
5. Can I make a smaller or larger version of the quilt?
Yes, this pattern is flexible. You can adjust the number of squares to create a smaller or larger quilt. For a smaller version, reduce the number of blocks, and for a larger quilt, increase the number of blocks accordingly.
Conclusion
The Simply Elegant Quilt is a timeless design that brings elegance and simplicity to any room. With its clean lines and subtle color contrasts, this quilt is easy to make and will become a cherished piece in your home. Whether you’re an experienced quilter or a beginner, this pattern is a wonderful project that will help you improve your skills and create a stunning piece of art.
Feel free to experiment with colors, fabrics, and quilting techniques to make this pattern your own. Don’t forget to share your final creation with others—happy quilting! If you have any questions or suggestions, please leave a comment below.