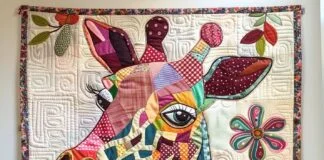
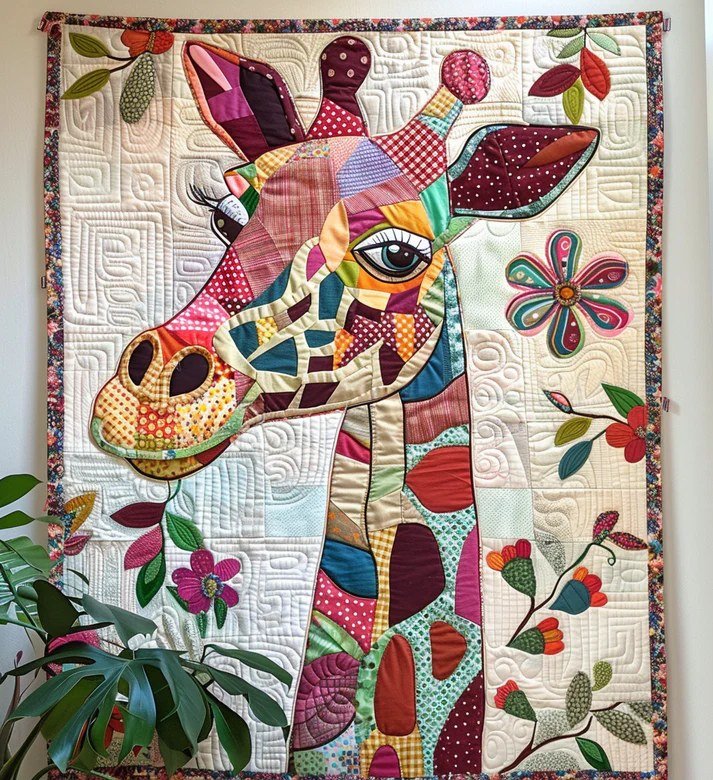
Creating a quilt featuring a Elegant Giraffe Patchwork Quilt design is a wonderful way to combine your quilting skills with a touch of whimsy. This quilt pattern showcases the majestic giraffe, with its long neck and elegant posture, while incorporating beautiful patchwork techniques. Whether you’re a beginner quilter or an experienced one, this tutorial will guide you through every step of making a stunning giraffe-themed quilt that will become a treasured piece in your collection.
The Elegant Giraffe Patchwork Quilt combines fun, creative patchwork with the elegant design of the giraffe, making it a fantastic project for anyone who loves animals and enjoys adding a playful yet sophisticated touch to their quilts. This quilt is perfect for a nursery, a cozy living room accent, or as a unique gift for animal lovers. In this tutorial, we’ll break down the steps for creating this quilt, from selecting the fabric to assembling the blocks and finishing the quilt.
Before starting the Giraffe Patchwork Quilt, it’s essential to gather the right materials and familiarize yourself with the techniques needed to bring this design to life. Let’s dive into the process!
1. Materials Needed for the Elegant Giraffe Patchwork Quilt
To create the Elegant Giraffe Patchwork Quilt, you’ll need to gather a variety of quilting materials. Here’s a list of the supplies you’ll need to get started:
Fabric
Selecting the right fabric is crucial for making this quilt shine. You’ll need the following fabrics:
- Giraffe Print Fabric: Look for fabric with a subtle giraffe print to represent the body and spots of the giraffe. This will be the focal point of the quilt.
- Solid Fabrics: Choose coordinating solid colors, such as beige, brown, or yellow, to represent the giraffe’s body, neck, and legs.
- Background Fabric: Select a neutral or calming background fabric such as cream, light brown, or soft green to bring out the design of the giraffe.
- Accent Fabrics: Consider adding accent fabrics like bright green or vibrant orange for details such as the giraffe’s mane or surroundings.
Rotary Cutter and Mat
A rotary cutter is essential for cutting fabric quickly and accurately. Pair it with a self-healing cutting mat to protect your surfaces and ensure precise cuts.
Advertising
Quilting Ruler
A quilting ruler will help you measure and cut straight lines for the blocks. This tool is essential for ensuring the patchwork pieces are the correct size.
Sewing Machine
A sewing machine is necessary for piecing the quilt blocks together. If you have an automatic quilting machine, it will make the process easier, but any machine that can do straight stitches will work.
Thread
Choose a high-quality quilting thread that matches or complements the fabric colors you’ve chosen. Neutral colors work best, such as beige, brown, or cream, depending on your fabric selections.
Iron and Ironing Board
Pressing your fabric and quilt blocks is essential for a smooth and professional finish. Use a hot iron to press the seams and remove any wrinkles from the fabric before you begin sewing.
Quilt Batting
For the inner layer of the quilt, you will need quilt batting to give it warmth and structure. Choose a medium-weight batting for a soft yet durable finish.
Quilt Backing
Finally, select a fabric for the backing of your quilt. You can either match it to the front or choose a complementary pattern to enhance the overall design.
Now that you have your materials ready, let’s move on to creating the quilt blocks that will form the giraffe pattern.
2. Creating the Giraffe Patchwork Blocks
The core of this Elegant Giraffe Patchwork Quilt is the patchwork block that represents the giraffe’s shape. These blocks are made using a combination of simple shapes and techniques to create the elegant giraffe design.
Cutting the Fabric for the Blocks
Start by cutting your fabric into the necessary shapes and sizes. For the giraffe block, you will need the following:
- Squares and Rectangles: Cut several squares and rectangles of various sizes that will form the giraffe’s body, neck, legs, and background.
- Triangles: For the giraffe’s face and spots, cut some small fabric triangles that will be stitched into the design.
Assembling the Giraffe Block
- Start with the Giraffe’s Neck: Begin by piecing together the giraffe’s long neck using rectangles. The neck should be tall and narrow, so cut long strips of fabric that can be sewn together to form a rectangular shape.
- Shape the Giraffe’s Body: Use larger rectangles or squares to create the giraffe’s body. The body can be made with solid colors or a giraffe-print fabric to add texture to the design.
- Add the Legs: For the legs, you can use thin strips of fabric in brown or beige to create long, rectangular legs for the giraffe. Attach the legs to the bottom of the body.
- Piece the Head and Face: Use small squares and triangles to form the giraffe’s head. The face should be slightly smaller than the body, and you can add small pieces for the ears and eyes.
- Add Giraffe Spots: One of the signature elements of a giraffe is its spots. Cut small squares or circles from a fabric that contrasts with the body color to represent the giraffe’s spots. These should be sewn onto the body in a random but balanced pattern.
Assembling the Block
Once you have all the pieces cut and ready, sew them together using a quarter-inch seam allowance. Take your time to align the pieces properly to ensure the giraffe’s body and neck are proportional and the block looks balanced.
Repeat the Process
You’ll need several of these giraffe blocks for the quilt, so repeat the process to create the desired number of blocks. Typically, a quilt may require 9 to 12 blocks depending on the size you want to achieve.
3. Assembling the Quilt Top
After creating the giraffe blocks, it’s time to assemble the quilt top. This step involves arranging the blocks in a layout that showcases the giraffe design and complements the patchwork elements.
Arranging the Blocks
Lay out your blocks in the desired pattern. You can choose a uniform grid layout or opt for a more random arrangement. If you want to emphasize the giraffe pattern, place the blocks in a diagonal or scattered layout.
Joining the Blocks
Once you’ve decided on a layout, sew the blocks together row by row. Use a quarter-inch seam allowance to ensure consistency. After each row is complete, sew the rows together to form the quilt top.
Adding Borders
For an elegant finish, consider adding borders around the quilt top. You can use a coordinating fabric in a solid color, or you can select a fabric that matches one of the colors already used in the quilt. Measure and cut the border fabric to fit the edges of the quilt top, and sew it around the entire quilt.
4. Quilting and Finishing the Quilt
With the quilt top assembled, it’s time to add the quilt batting and backing, then quilt everything together.
Preparing the Quilt Layers
Lay out the quilt backing fabric on a flat surface, then place the quilt batting on top. Finally, place the quilt top on top of the batting, making sure all layers are smooth and wrinkle-free. Pin or baste the layers together to hold them in place.
Quilting the Layers
Now, it’s time to quilt the layers together. You can use hand quilting, machine quilting, or even free-motion quilting to add texture and depth to the quilt. For an Elegant Giraffe Patchwork Quilt, consider quilting along the seams of the giraffe blocks to emphasize the design, or you can quilt an overall pattern such as swirls or a meandering design.
Binding the Quilt
Once the quilt is quilted, add the binding around the edges to finish it. Cut strips of fabric for the binding, fold them in half, and sew them around the edges of the quilt. This step gives the quilt a polished, professional look and ensures all the raw edges are tucked away.
Final Pressing
Give the finished quilt a final press with an iron to remove any wrinkles and to set the seams. This will give your Elegant Giraffe Patchwork Quilt a smooth, crisp finish.
FAQ
1. What size should I cut the fabric for the giraffe blocks?
For a standard quilt block, you can cut the giraffe pieces into 6-inch or 8-inch squares and rectangles. Adjust the size based on the dimensions you want for the quilt.
🌟Join our exclusive Quilt broadcast list on Messenger! Receive the best patterns, tips, and updates directly in your inbox. Our team is ready to send you delightful content that will inspire your projects. Don’t miss this opportunity to stay updated and create amazing pieces. Join now and be part of this passionate quilt community!✨📩
2. Can I make the quilt larger or smaller?
Yes, you can adjust the number of blocks you make and the size of the blocks to change the overall quilt size. Add more blocks for a larger quilt or reduce the number for a smaller one.
3. Can I use different fabrics for the giraffe spots?
Yes, you can use a variety of fabrics for the giraffe spots, such as animal prints, solid colors, or even textured fabrics to create a unique look for each quilt.
4. How do I ensure the quilt stays even while piecing?
Use a quarter-inch seam allowance and press each seam after sewing. This helps keep the quilt pieces aligned and ensures a consistent finish.
5. What quilting technique should I use?
For an elegant finish, machine quilting works well. You can opt for straight-line quilting or free-motion quilting to add creative touches to your quilt.
Conclusion
In this Elegant Giraffe Patchwork Quilt tutorial, we walked through each step, from selecting fabrics to piecing the blocks and quilting the final product. By following these instructions, you’ll be able to create a charming and elegant quilt that showcases the beauty of the giraffe in patchwork form.
We hope this tutorial inspires you to make your own giraffe-themed quilt. Feel free to leave a comment with your thoughts or any suggestions for future tutorials! Happy quilting!